API credentials let your systems interact with Ripple Custody (Wallet) programmatically. Every credential authenticates with OAuth 2.0 client credentials and is scoped with a permission set that defines exactly what it can do. As an owner or administrator, you create, scope, and manage credentials in the console to control what each integration can access.
For how credentials, credential types, and permissions work, see API credentials overview. For security recommendations, see API credentials best practices.
Given the sensitive nature of API credentials, adhering to strict best practices is crucial to preventing unauthorized access to your assets. Read API credentials best practices before you create credentials for production.
| Action | Console role | Console procedure | API procedure |
|---|---|---|---|
| Create a credential | Owner, Administrator | Create API credentials | - |
| Get an access token | - | - | Authenticate |
| View or edit a credential | Owner, Administrator (Auditor can view) | View and edit credentials | - |
| Disable or enable a credential | Owner, Administrator | Disable a credential | - |
| Delete a credential | Owner, Administrator | Delete a credential | - |
Permissions: In the console, owners and administrators can create, update, enable, disable, and delete credentials, and owners, administrators, and auditors can view them. See User roles and permissions. The token exchange needs an enabled credential of any type. See Client credentials exchange.
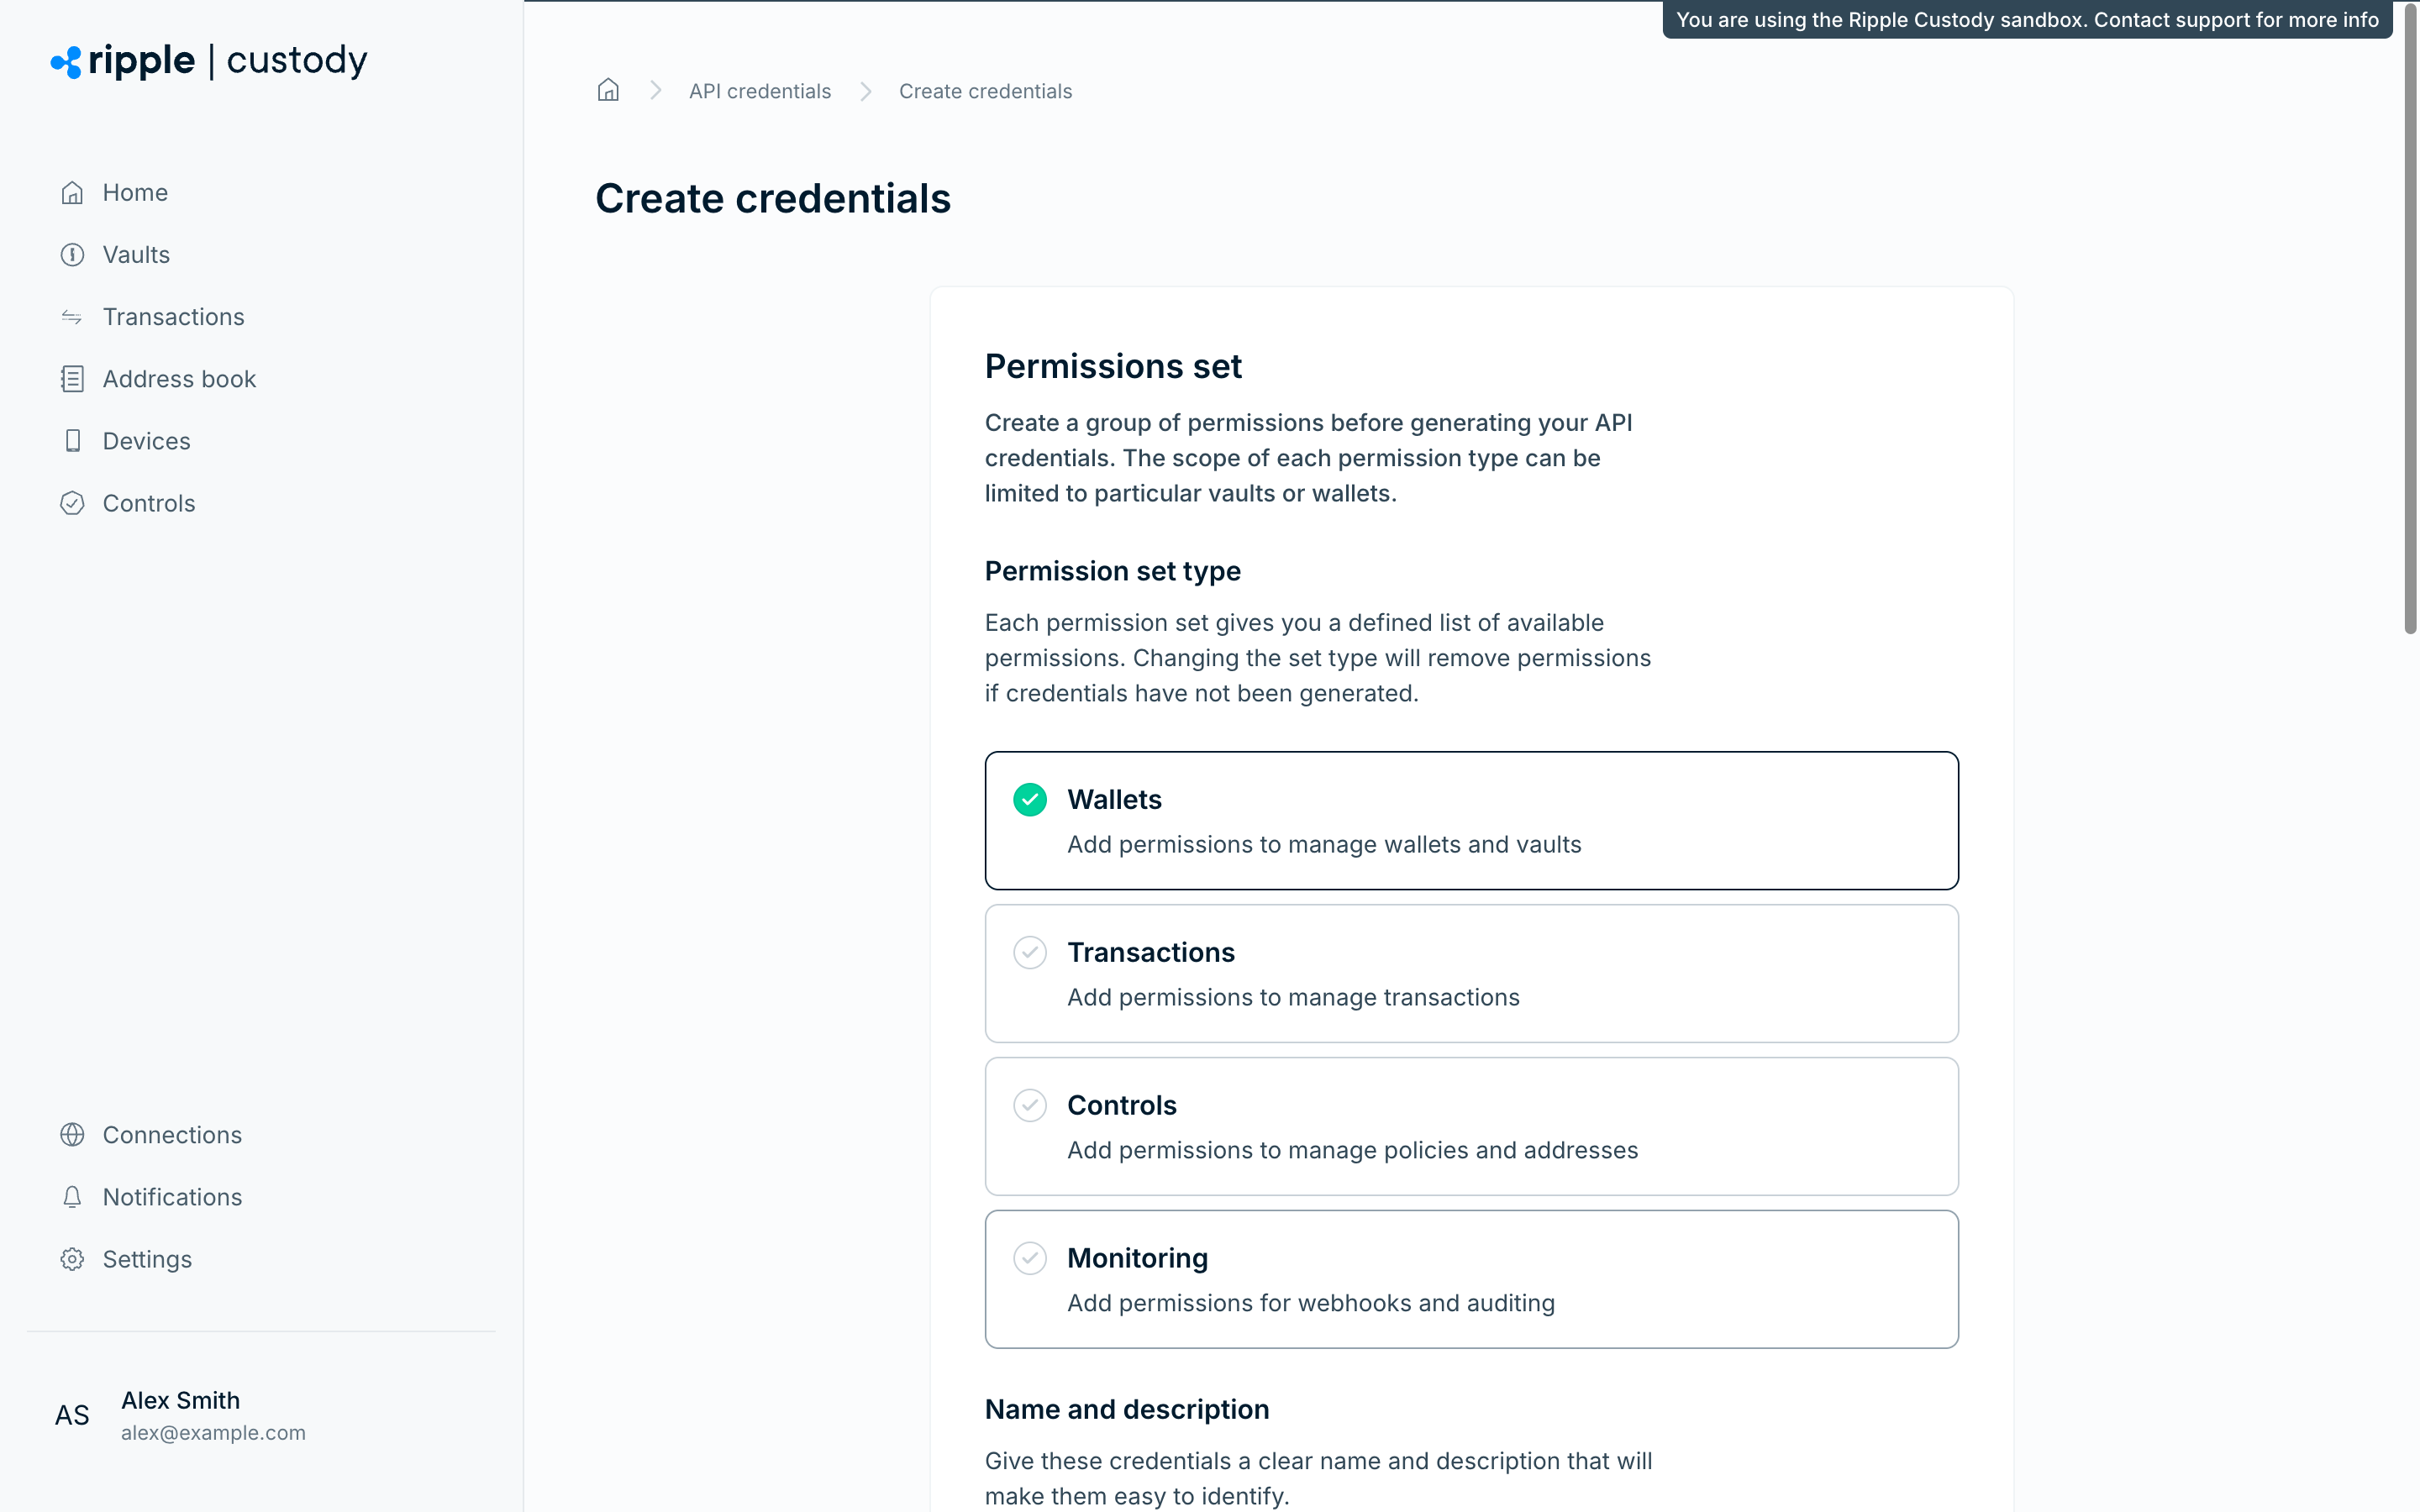
Go to Settings > API credentials.
Select Create credentials.
Select a Permission set type. This governs which permissions you can add to the credentials. Changing the set type after you add permissions resets them:
Permission set type What it grants Wallets Manage wallets and vaults Transactions Manage transactions Controls Manage policies and addresses Monitoring Webhooks and auditing See Credential types for the full list of what each type covers.
Enter a name (5–50 characters). Choose a descriptive name that identifies the integration (for example, "Production - Transaction Service").
Enter an optional description (5–50 characters) that makes the purpose of the credentials clear.
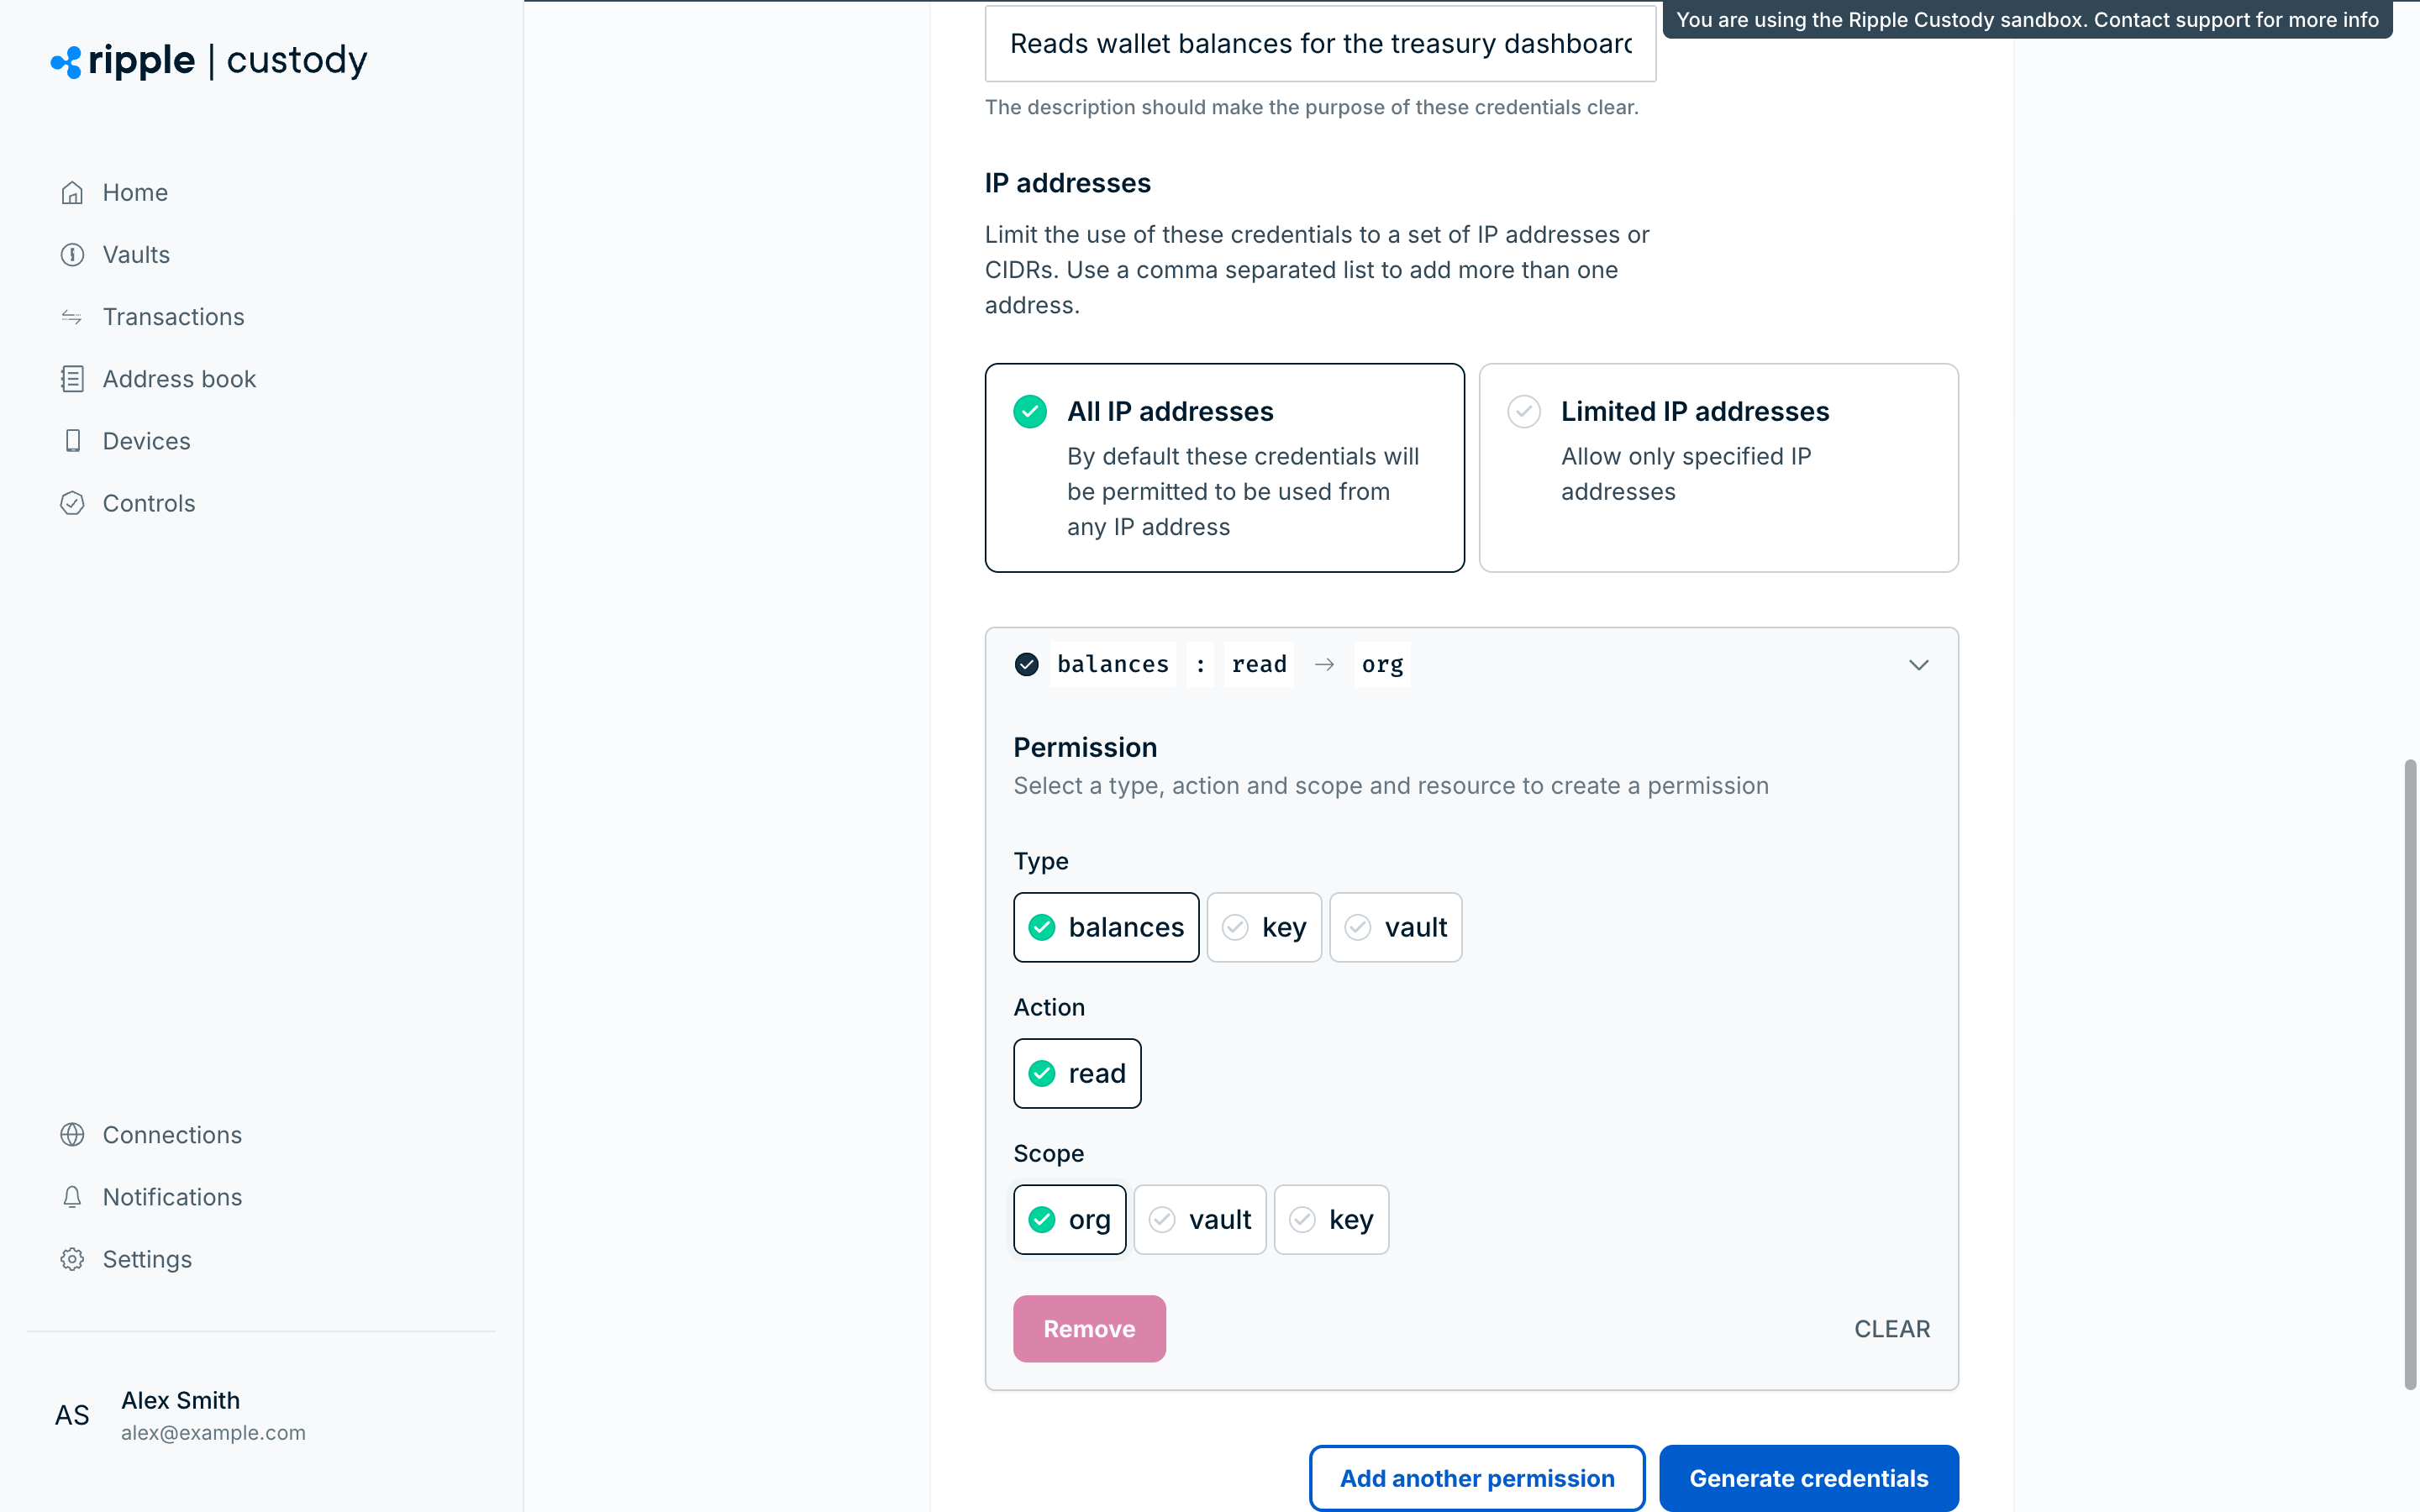
Configure IP addresses:
- All IP addresses (
0.0.0.0/0): suitable for sandbox testing. - Limited IP addresses: enter up to 6 IPv4 addresses or CIDR ranges, separated by commas. Use this in production.
- All IP addresses (
Build the permissions. The form starts with one empty permission. For each permission, select a type, action, and scope, and for a
vaultorkeyscope, optionally select up to 5 resources. This is the most important part of the process, because it sets which actions the credentials can perform.Select Add another permission to add more, or Remove to delete one. Following the principle of least privilege, limit the scope of individual credentials.
Select Generate credentials.
In the API Credentials dialog, copy the Client ID (
clientId) and Client secret (clientSecret), and then select Done. You need both to authenticate your requests.
To create credentials that can only read asset balances in a particular vault, select the following options:
- Permission set type: wallets
- Permission type: balances
- Permission action: read
- Permission scope: vault
- Permission resource: the specific vault
Ripple Custody (Wallet) displays the client secret only once. Store it in a secrets manager or secure vault. If you lose it, you must delete the credential and create a new one.
Make sure the credentials are enabled.
Credentials are enabled automatically when you create them.
Exchange the
clientIdandclientSecretfor an access token.You do this with the OAuth client credentials flow through the API. See the Ripple Custody (Wallet) API for details.
curl --location 'https://api.palisade.co/v2/credentials/oauth/token' \
--header 'Content-Type: application/json' \
--data '{
    "clientId": "cIUkXkZBBx3zukqr6LJ3th2CVaYrgotH",
    "clientSecret": "MXDAtUtaoU7WzuhbtY76DHTH_2lvqNg7FEMnUFAFRDVV0UUGGkkOwTJJrnTnywpF"
}'
You receive a response containing the access token and other details.
expiresInis the number of seconds until the token expires.scopehas the same value for every credential and doesn't list the credential's permissions, which Ripple Custody (Wallet) checks on the server for each request.
{
    "accessToken": "eyJhbGciOiJSUzI1NiIsInR5cCI6IkpXVCIsImtpZCI6ImxBMmpQWDd5NWZTR0tMWDFtMkpucyJ9.eyJodHRwczovL3BhbGlzYWRlLmNvIjp7ImRldmljZUlkIjpudWxsLCJvcmdhbml6YXRpb25JZCI6IjIxYzgxMzE5LTViODMtNDVmOS1iNjQ4LTQyMDU1MDg0YWYxNSIsInNpZ25hdHVyZVZlcmlmaWNhdGlvbktleSI6bnVsbCwidXNlcklkIjoiMWU0YzFmYmEtOGMzNy00OGY0LWJhZDgtNTg0ODY0OTBmMjQxIn0sImlzcyI6Imh0dHBzOi8vcGFsaXNhZGUtZGV2ZWxvcG1lbnQuZXUuYXV0aDAuY29tLyIsInN1YiI6ImNJVWtYa1pCQngzenVrcXI2TEozdGgyQ1ZhWXJnb3RIQGNsaWVudHMiLCJhdWQiOiJodHRwczovL2FwaS5wYWxpc2FkZS5jby8iLCJpYXQiOjE3MjI4ODk3MTIsImV4cCI6MTcyMjg5MzMxMiwic2NvcGUiOiJiYWxhbmNlczpyZWFkOm9yZzppZD0yMWM4MTMxOS01YjgzLTQ1ZjktYjY0OC00MjA1NTA4NGFmMTU6KiIsImd0eSI6ImNsaWVudC1jcmVkZW50aWFscyIsImF6cCI6ImNJVWtYa1pCQngzenVrcXI2TEozdGgyQ1ZhWXJnb3RIIiwicGVybWlzc2lvbnMiOlsiYmFsYW5jZXM6cmVhZDpvcmc6aWQ9MjFjODEzMTktNWI4My00NWY5LWI2NDgtNDIwNTUwODRhZjE1OioiXX0.AxTTxM2oLArtE6uRNJ1ADhMmrvwVfFQXu1vE5XZqpK64HuXwZB26R-25P4XpA9LX0QH7JTOpE9snNN7VYs4RVGXwNKeDRW0Zne7IkAVUwCAfhBkVxZ8Z_BZfNrTumGa-2R45XiQ2v-EfQZZV59q95eEz0f1ALWlc4XgVp_A5LPR25yys-H4sWPJJq5JUBdHtPVr7gUSkH7P3P4GSi3iZfcKaqijEwpJxN7Qmf7j2UFSC68-WeDxDXlIZIWkgCUz4lfPkYcz7oxpjRRGIej9eTtV9c5fCrkZcEaSOsSvqL3O2ubFqQm8hf6czfkOlyBmu7E2PJzImD1JJqpkB_qYfXg",
    "scope": "credential:read:credential::*",
    "expiresIn": 60,
    "tokenType": "Bearer"
}- Use the access token to authenticate requests to the API.
curl --location 'https://api.palisade.co/v2/balances' \
--header 'Authorization: Bearer eyJhbGciOiJSUzI1NiIsInR5cCI6IkpXVCIsImtpZCI6ImxBMmpQWDd5NWZTR0tMWDFtMkpucyJ9.eyJodHRwczovL3BhbGlzYWRlLmNvIjp7ImRldmljZUlkIjpudWxsLCJvcmdhbml6YXRpb25JZCI6IjIxYzgxMzE5LTViODMtNDVmOS1iNjQ4LTQyMDU1MDg0YWYxNSIsInNpZ25hdHVyZVZlcmlmaWNhdGlvbktleSI6bnVsbCwidXNlcklkIjoiMWU0YzFmYmEtOGMzNy00OGY0LWJhZDgtNTg0ODY0OTBmMjQxIn0sImlzcyI6Imh0dHBzOi8vcGFsaXNhZGUtZGV2ZWxvcG1lbnQuZXUuYXV0aDAuY29tLyIsInN1YiI6ImNJVWtYa1pCQngzenVrcXI2TEozdGgyQ1ZhWXJnb3RIQGNsaWVudHMiLCJhdWQiOiJodHRwczovL2FwaS5wYWxpc2FkZS5jby8iLCJpYXQiOjE3MjI4ODk3MTIsImV4cCI6MTcyMjg5MzMxMiwic2NvcGUiOiJiYWxhbmNlczpyZWFkOm9yZzppZD0yMWM4MTMxOS01YjgzLTQ1ZjktYjY0OC00MjA1NTA4NGFmMTU6KiIsImd0eSI6ImNsaWVudC1jcmVkZW50aWFscyIsImF6cCI6ImNJVWtYa1pCQngzenVrcXI2TEozdGgyQ1ZhWXJnb3RIIiwicGVybWlzc2lvbnMiOlsiYmFsYW5jZXM6cmVhZDpvcmc6aWQ9MjFjODEzMTktNWI4My00NWY5LWI2NDgtNDIwNTUwODRhZjE1OioiXX0.AxTTxM2oLArtE6uRNJ1ADhMmrvwVfFQXu1vE5XZqpK64HuXwZB26R-25P4XpA9LX0QH7JTOpE9snNN7VYs4RVGXwNKeDRW0Zne7IkAVUwCAfhBkVxZ8Z_BZfNrTumGa-2R45XiQ2v-EfQZZV59q95eEz0f1ALWlc4XgVp_A5LPR25yys-H4sWPJJq5JUBdHtPVr7gUSkH7P3P4GSi3iZfcKaqijEwpJxN7Qmf7j2UFSC68-WeDxDXlIZIWkgCUz4lfPkYcz7oxpjRRGIej9eTtV9c5fCrkZcEaSOsSvqL3O2ubFqQm8hf6czfkOlyBmu7E2PJzImD1JJqpkB_qYfXg'Always exchange your credentials at /v2/credentials/oauth/token. Requesting tokens any other way uses a limited issuance quota and can cause authentication failures for your organization. The endpoint caches tokens on the server, so call it whenever you need a token and don't build your own cache. Tokens last 60 seconds in Production and 1 hour in Sandbox and Development. Request a new token when the current one expires.
After you create API credentials, they're listed in a table on the API credentials page. To find a credential, use Search credentials, or select Filters to narrow the list by category, status, active state, name, description, client ID, ID, or date created or updated. To manage a credential, select it, or open the Actions menu (three dots) in its row.
Viewing a credential displays a summary that includes:
- Name and status
- Description
- Type
- Client ID (
clientId, but notclientSecret) - ID
- Permissions
- IP addresses, if you limited the credential to specific addresses
- Activity: who created the credential, and when it was created and last updated
To edit the credential, select Edit credentials on the summary, change the permissions, and then select Update credentials. Only the permissions are editable. You can't edit the set type, name, description, or IP address settings.
Disabling a credential immediately prevents it from authenticating, and it stays disabled until you enable it again. Access tokens already issued to the credential continue to work until they expire (60 seconds in Production, up to 1 hour in Sandbox and Development).
Disable a credential when:
- You suspect credential compromise.
- A team member who managed the integration leaves.
- You need to temporarily pause an integration for maintenance.
- Go to Settings > API credentials.
- Select the credential, or open the Actions menu in its row.
- Select Disable.
- In the Disable credentials dialog, select Disable to confirm.
The change goes through your organization's API credentials approval group. If you don't have one, Ripple Custody (Wallet) approves it automatically, so the credential can show Approval pending briefly before it's disabled. See Approvals.
To re-enable a credential, open it or its Actions menu, select Enable, and then confirm in the Enable credentials dialog.
Deleting permanently removes the credential, and you can't recover it. Any integration that uses it stops working as soon as its existing tokens expire.
- Go to Settings > API credentials.
- Open the Actions menu (three dots) in the credential's row.
- Select Delete.
- In the Delete credentials dialog, select Delete to confirm.
- API credentials overview: Credential types, permissions, and what requires the console
- API credentials best practices: Least privilege, IP allowlisting, rotation, and monitoring
- Use the API: End-to-end API walkthrough
- Configure approval flows: Require approval for credential creation
- Ripple Custody (Wallet) API reference