This page takes you through the steps required to connect your accounts and start purchasing and redeeming Ripple USD (RLUSD).
Access to Ripple Stablecoin is not granted unless all onboarding steps are completed.
To connect your accounts in the Ripple Stablecoin UI, complete the following steps:
To add your contact information:
On the Home page, in the Add Contact Info section, click Start.
The page displays an Add Contact Info form.
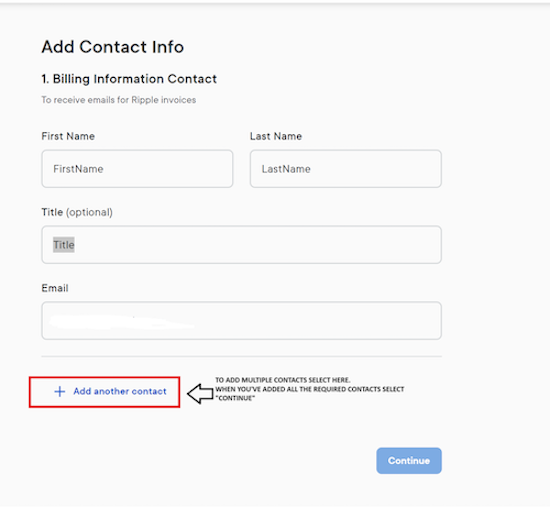
Enter your company's contact information. This point of contact will receive emails for Ripple invoices.
NoteYou can add multiple contacts by clicking Add another contact at the bottom of the form.
Click Continue to submit the contact details.
To upload your tax documents:
On the Home page, in the Upload Tax Documents section, click Start.
Complete and upload the tax form that applies to your situation, either W-9 (for US individuals or entities) or W-8BEN-E (for non-US entities).
Click Next.
You can add a maximum of three wallets per blockchain.
To add your crypto wallets:
On the Home page, in the Add Crypto Wallets section, click Start.
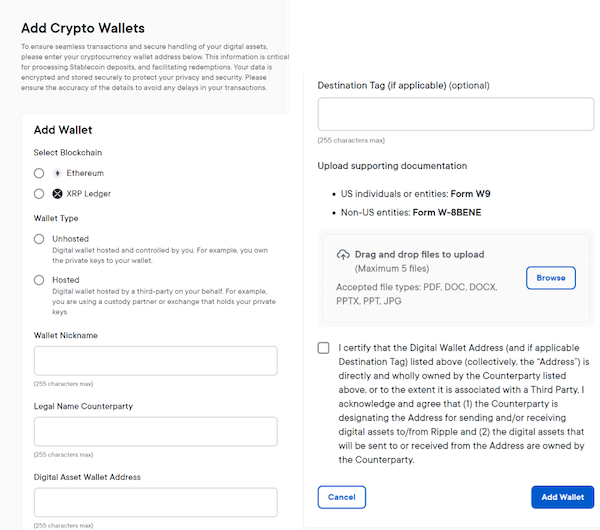
The page displays an Add Crypto Wallets form where you can enter your wallet information.
 Tip
TipScroll down the page to see the full length of the form.
Under Select Blockchain, choose the relevant blockchain for your wallet. This can be either XRP Ledger or Ethereum.
In the Wallet Type section, select which type describes your wallet.
This can be one of the following:
- Unhosted: A digital wallet hosted and controlled by you.
- Hosted: A digital wallet managed by a third-party on your behalf.
In the Account Name field, enter a unique nickname for your wallet that easily identifies it in the UI.
In the Legal Name Counterparty field, enter the counterparty name.
In the Digital Asset Wallet Address field, provide your wallet address. For example:
- XRPL:
rhVsmCgP9JDCpjuuC46zf3YoaJgXXAsZ1L - Ethereum:
0x30939b29ce5000fdc1701c4366f7dc4d07c36ee3For
- XRPL:
Provide a Destination Tag, if applicable.
The destination tag is a specific identifier that can be used by off-ledger systems to process a payment.In the Upload supporting documentation section, click Browse, or drag and drop your files to upload your documents.
Select the acknowledgement checkbox.
Click Add Wallet to complete the process.
When you first add a new wallet its Status is initially set to Pending. This just means that it is pending Ripple compliance approval, and you don't have to do anything further. Approval can take a few hours up to a maximum of one business day.
If you want to add another wallet, repeat the above steps, for a maximum of three wallets per blockchain.
While onboarding, you can connect a bank account to your RLUSD. This is the initial bank account from which you can deposit funds to purchase Ripple USD (RLUSD) stablecoin, and to receive funds when redeeming Ripple USD (RLUSD).
RLUSD lets you add additional bank accounts for a maximum of three, for purchasing RLUSD, and to designate one of these bank accounts as your redemption account that will receive funds when redeeming RLUSD to fiat USD currency. For more information see Bank accounts.
This page only describes adding an initial bank account during onboarding.
The bank account you provide must be owned by the same entity as the company that is onboarding with Ripple.
To add your bank account information:
On the Home page, in the Add Bank Account Details section, click Start.
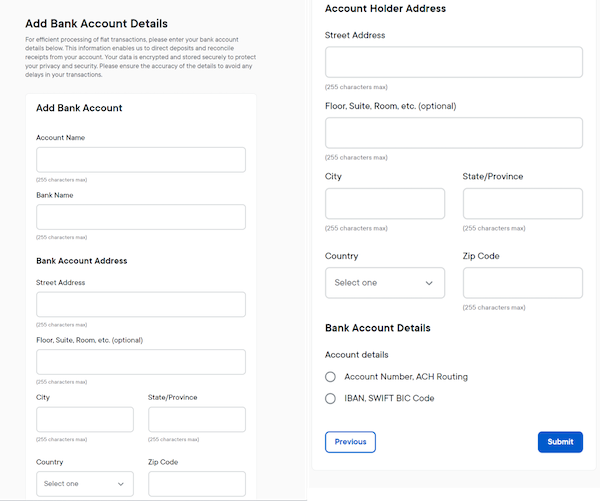
The page displays an Add Bank Account Details form where you can enter your bank account information.
 Tip
TipScroll down the page to see the full length of the form.
In the Add Bank Account section, enter the Account Name and Bank Name.
In the Add Bank Account Address section, enter the address of the bank associated with the account.
The address includes Street Address, Floor, Suite, Room, etc. (optionally), City, State/Province, Country, Zip Code.In the Account Holder Address section, enter the address of the account holder.
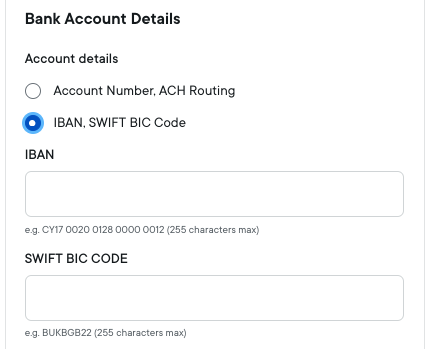
Under Bank Account Details, select the relevant account option:
Account Number, ACH Routing: Enter your account and routing number.
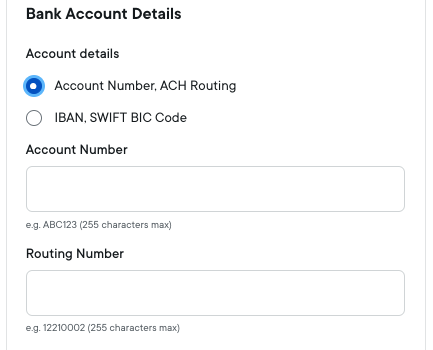
IBAN, SWIFT BIC CODE: Enter your IBAN and SWIFT code.
Click Submit.
The account connection process is complete, and you can now access the Ripple Stablecoin UI.