Connecting to digital asset exchanges
Use this step-by-step guide to set up your environment to submit payments with RippleNet through On-Demand Liquidity. This guide contains instructions specific to several digital asset exchanges.
Digital asset exchanges may offer multiple account options when you open an account. Each option may limit the amount of trades you can make each month, and the amount you can withdraw from your account on a daily or monthly basis. When opening your account, make sure to select the account option that fits your expected needs for On-Demand Liquidity transactions, and adjust your daily and monthly withdrawal limits in your exchange account's settings to meet those needs on that exchange.
Liquidity paths and supported exchanges
This section describes the liquidity paths, exchanges, supported currencies, and payout methods that On-Demand Liquidity supports across RippleNet.
| Exchange | Supported currencies | Payout methods and time |
|---|---|---|
| AUDD | AUD | AUD: Bank transfer |
| Bitso | USD / MXN | USD: Wire to USD account, but no automated payout MXN: SPEI - real time 24/7 to Mexican bank accounts / Bitso transfer / Instant/debit card transfer / mobile phone transfer |
| Bitstamp | USD / EUR / GBP | USD: Domestic USD payments / ACH transfers, 1-2 business days. EUR SEPA payments, 1-2 business days / Instant SEPA config by country/bank. GBP: FPS, 1-2 business days. * Bitstamp is unable to make GBP CHAPS payouts. |
| BTC Markets | AUD | AUD: BPay and instant OSKO payments. |
| Coinbase Prime | USD* | USD: ACH or wire transfer |
| Coins.ph | PHP | PHP: Cash pickup / Electronic funds transfers (InstaPay) / Credit to bank account / E-wallet / PesoNet |
| Independent Reserve | USD / SGD / AUD | USD and SGD: Bank transfer AUD: Bank transfer (through BTCM). |
| PDAX | PHP | PHP: Electronic funds transfers (InstaPay) / Credit to bank account / E-wallet / PesoNet |
| Uphold | USD / EUR / GBP | USD: Electronic funds transfers, 24/7 with settlement on business days only EUR: SEPA payments, 24/7 with settlement on business days only / SEPA Instant, 24/7 GBP: FPS, 24/7 |
*For any crypto asset, you must set up a wallet from your portfolio on Coinbase Prime.
Exchange minimum and maximum order requirements
Each digital asset exchange may have minimum and/or maximum transaction order amount requirements. If a transaction does not meet these requirements, On-Demand Liquidity will reject the payment transaction, failing the payment with an error.
| Exchange | Minimum Order Amount | Maximum Order Amount |
|---|---|---|
| AUDD | 100 AUD | N/A |
| Bitso | 0.50 USD 10 MXN |
N/A |
| Bitstamp | 10 USD / EUR / GPB | N/A |
| BTC Markets | 0.01 AUD | N/A |
| Coinbase Prime | N/A | N/A |
| Coins.ph | 0.65 PHP (Coins.ph) 10 PHP (CoinsPro) |
N/A |
| Independent Reserve | 50 AUD | N/A |
| PDAX | 10 PHP | N/A |
| Uphold | 5 USD 10 EUR / GBP |
25,000 USD / EUR / GBP |
Set up your environment
Complete the following setup tasks to enable RippleNet to use On-Demand Liquidity:
- Pre-fund your source exchange account
- Generate exchange API keys
- Upload exchange API secret and key to Ripple Payments
1. Pre-fund your source exchange account
Pre-fund your source exchange account to supply sufficient liquidity to fund the payments you submit through RippleNet. The following digital asset exchanges can be set up as your source exchange for On-Demand Liquidity:
Tip
Each exchange requires you to follow specific steps to fund your account. For more information about funding your account at a source exchange for On-Demand Liquidity payments through RippleNet, refer to the documentation for that exchange.
2. Generate exchange API keys
Generate exchange API keys and secrets to enable the RippleNet On-Demand Liquidity service to communicate with your source and destination exchange accounts.
While generating your API keys, take some time to ensure you set the correct daily and monthly transfer/withdrawal limits for your needs on that exchange. If you decide to increase your trade or withdrawal amounts, the exchange may require additional documentation and time to approve that change.
Note
The following instructions are for third-party sites and may change without notice. If you notice that the instructions are outdated, please submit feedback to RippleNet documentation.
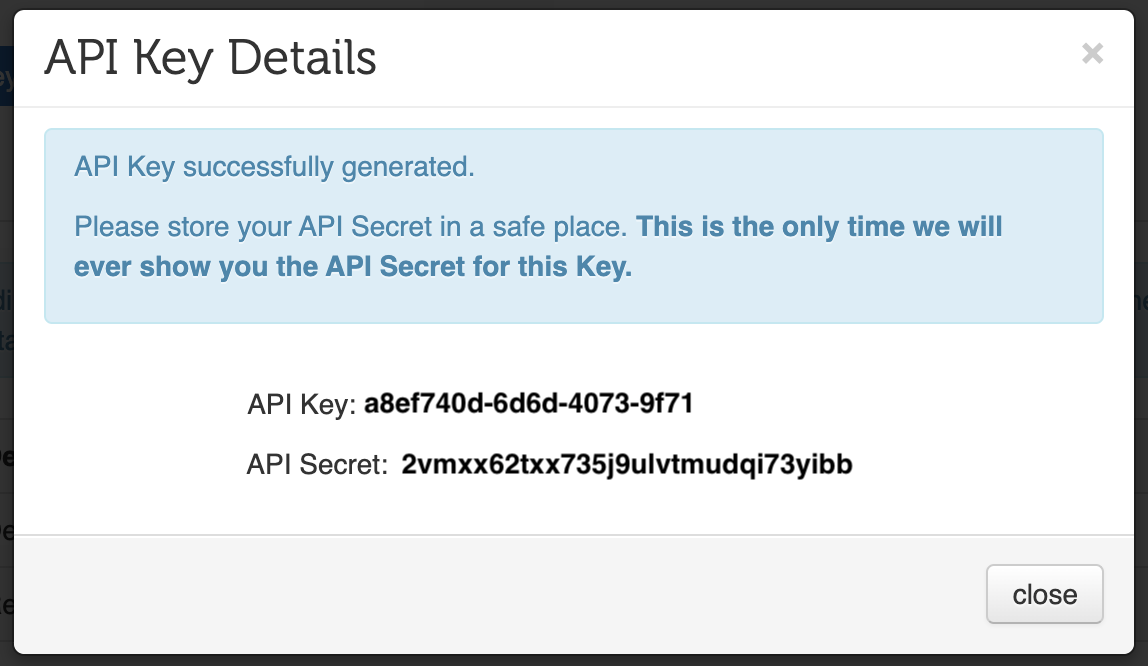
Exchanges will only present your API secret once when you generate your public API key. Take some time to record your exchange API secret and store the secret in a safe place. You need both your public API key and private secret to register your exchange account with RippleNet On-Demand Liquidity.
AUDD
To generate your AUDD API token:
- Log in to the AUDD Digital portal.
- From the left side navigation, select Developers > API tokens .
- In the top right corner, select NEW TOKEN .
-
In the
Duration
field, set the duration to
0and reauthenticate with your Password and 2FA one-time password. -
From the
New api token
window, copy the
Token
and store it in a safe place. You need it when you
upload your exchange API key and secret to Ripple Payments
.
Warning
AUDD only displays your API token once.
Bitso
To generate your Bitso API key and secret:
- Log in to your Bitso account. Open the user menu in the top right and select Profile .
- In the left menu, select API .
-
On the "API SETUP" page, select
Add new API key
. The "Add new API key" page appears.
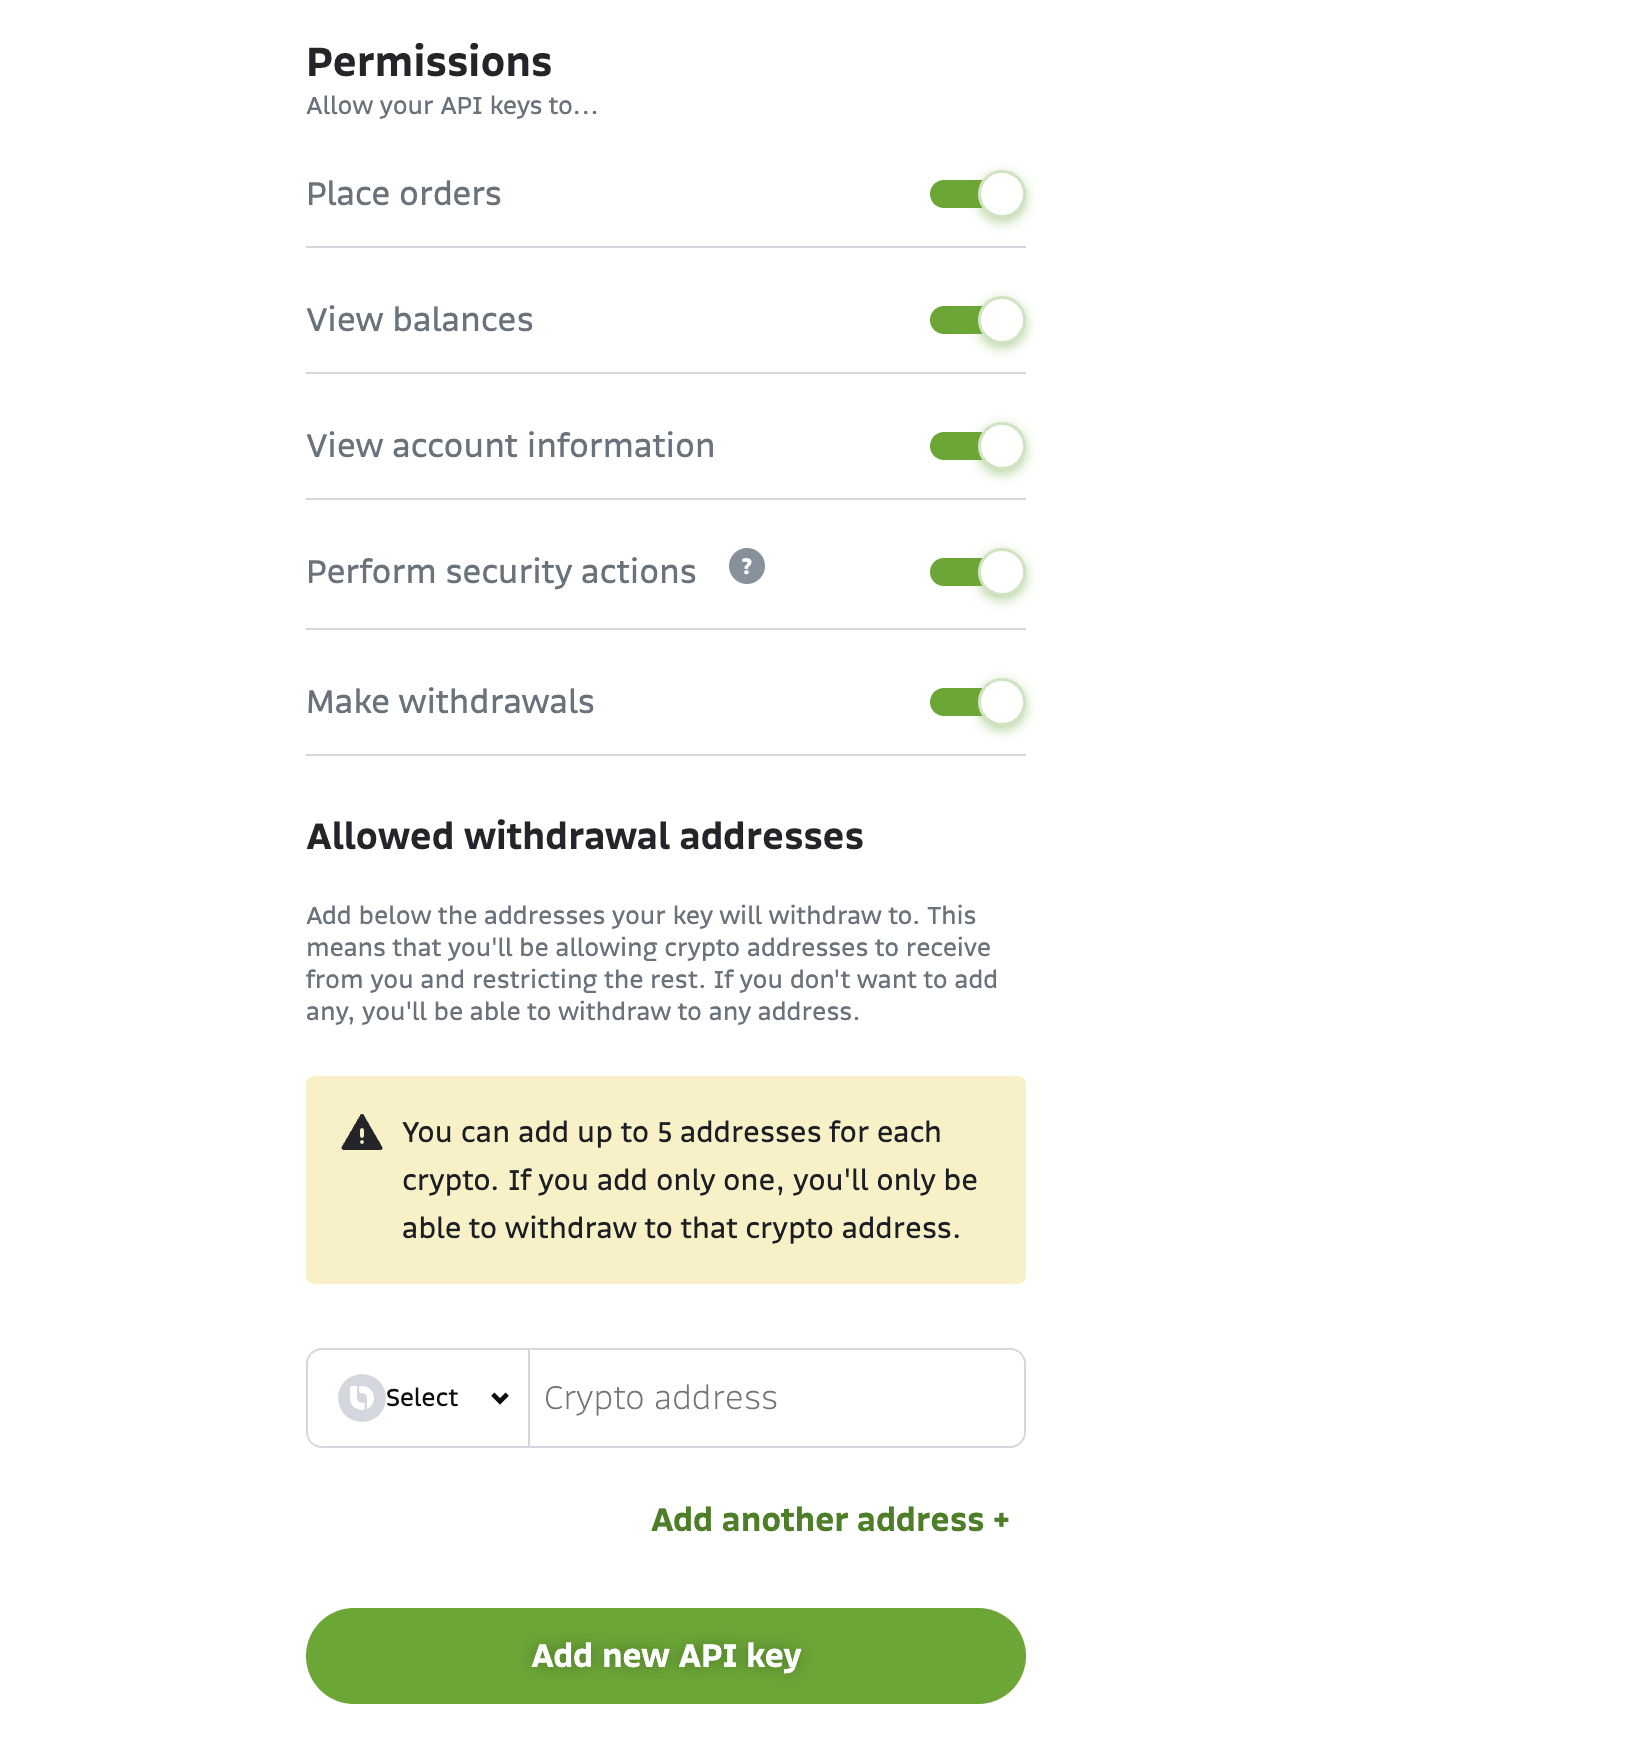
- In the API key's name field, enter a name for your API key.
-
Enable all
Permissions
(if requested).
Note:
Leave the Allowed withdrawal addresses section blank. Do not specify a crypto address. Specifying an address will prevent Ripple Payments ODL from sending the bridge asset.
- Select Add new API key to save your credentials.
-
Copy the
Bitso API Secret
Bitso generates for your API key and store it in a safe place. You need it when you
upload your exchange API key and secret to Ripple Payments
.
Warning
Bitso only displays your API Secret once.
- Navigate to your account LIMITS in the left menu of your Profile page, and review your account limits to ensure they meet daily and monthly payments volume estimates required for your use case.
For more information, visit Bitso to learn how to Generate Your API Credentials.
Bitstamp
When creating API keys ensure that you don't have more than one API key active for Ripple.
To generate your Bitstamp API key and secret:
- Log in to your Bitstamp account and go to Account > Settings > API Access .
-
Withdrawal Address Whitelist:
Follow the Bitstamp instructions to disable cryptocurrency withdrawals:
https://www.bitstamp.net/account/withdraw/whitelist/
.
Note
The withdrawal whitelist instructions are only available if you are logged in with a verified account.
- Select New API key . The "API access" page displays.
-
Enable the following permissions:
Withdrawals
- Open, cancel and view bank withdrawals
-
Create crypto withdrawals
- Allow for all current and future available assets
- List withdrawal requests
Order management
- View open orders
- Cancel orders
- Create buy orders
- Create sell orders
General permissions
- View account balances
- View your transactions
Deposits
- View Ripple deposit address
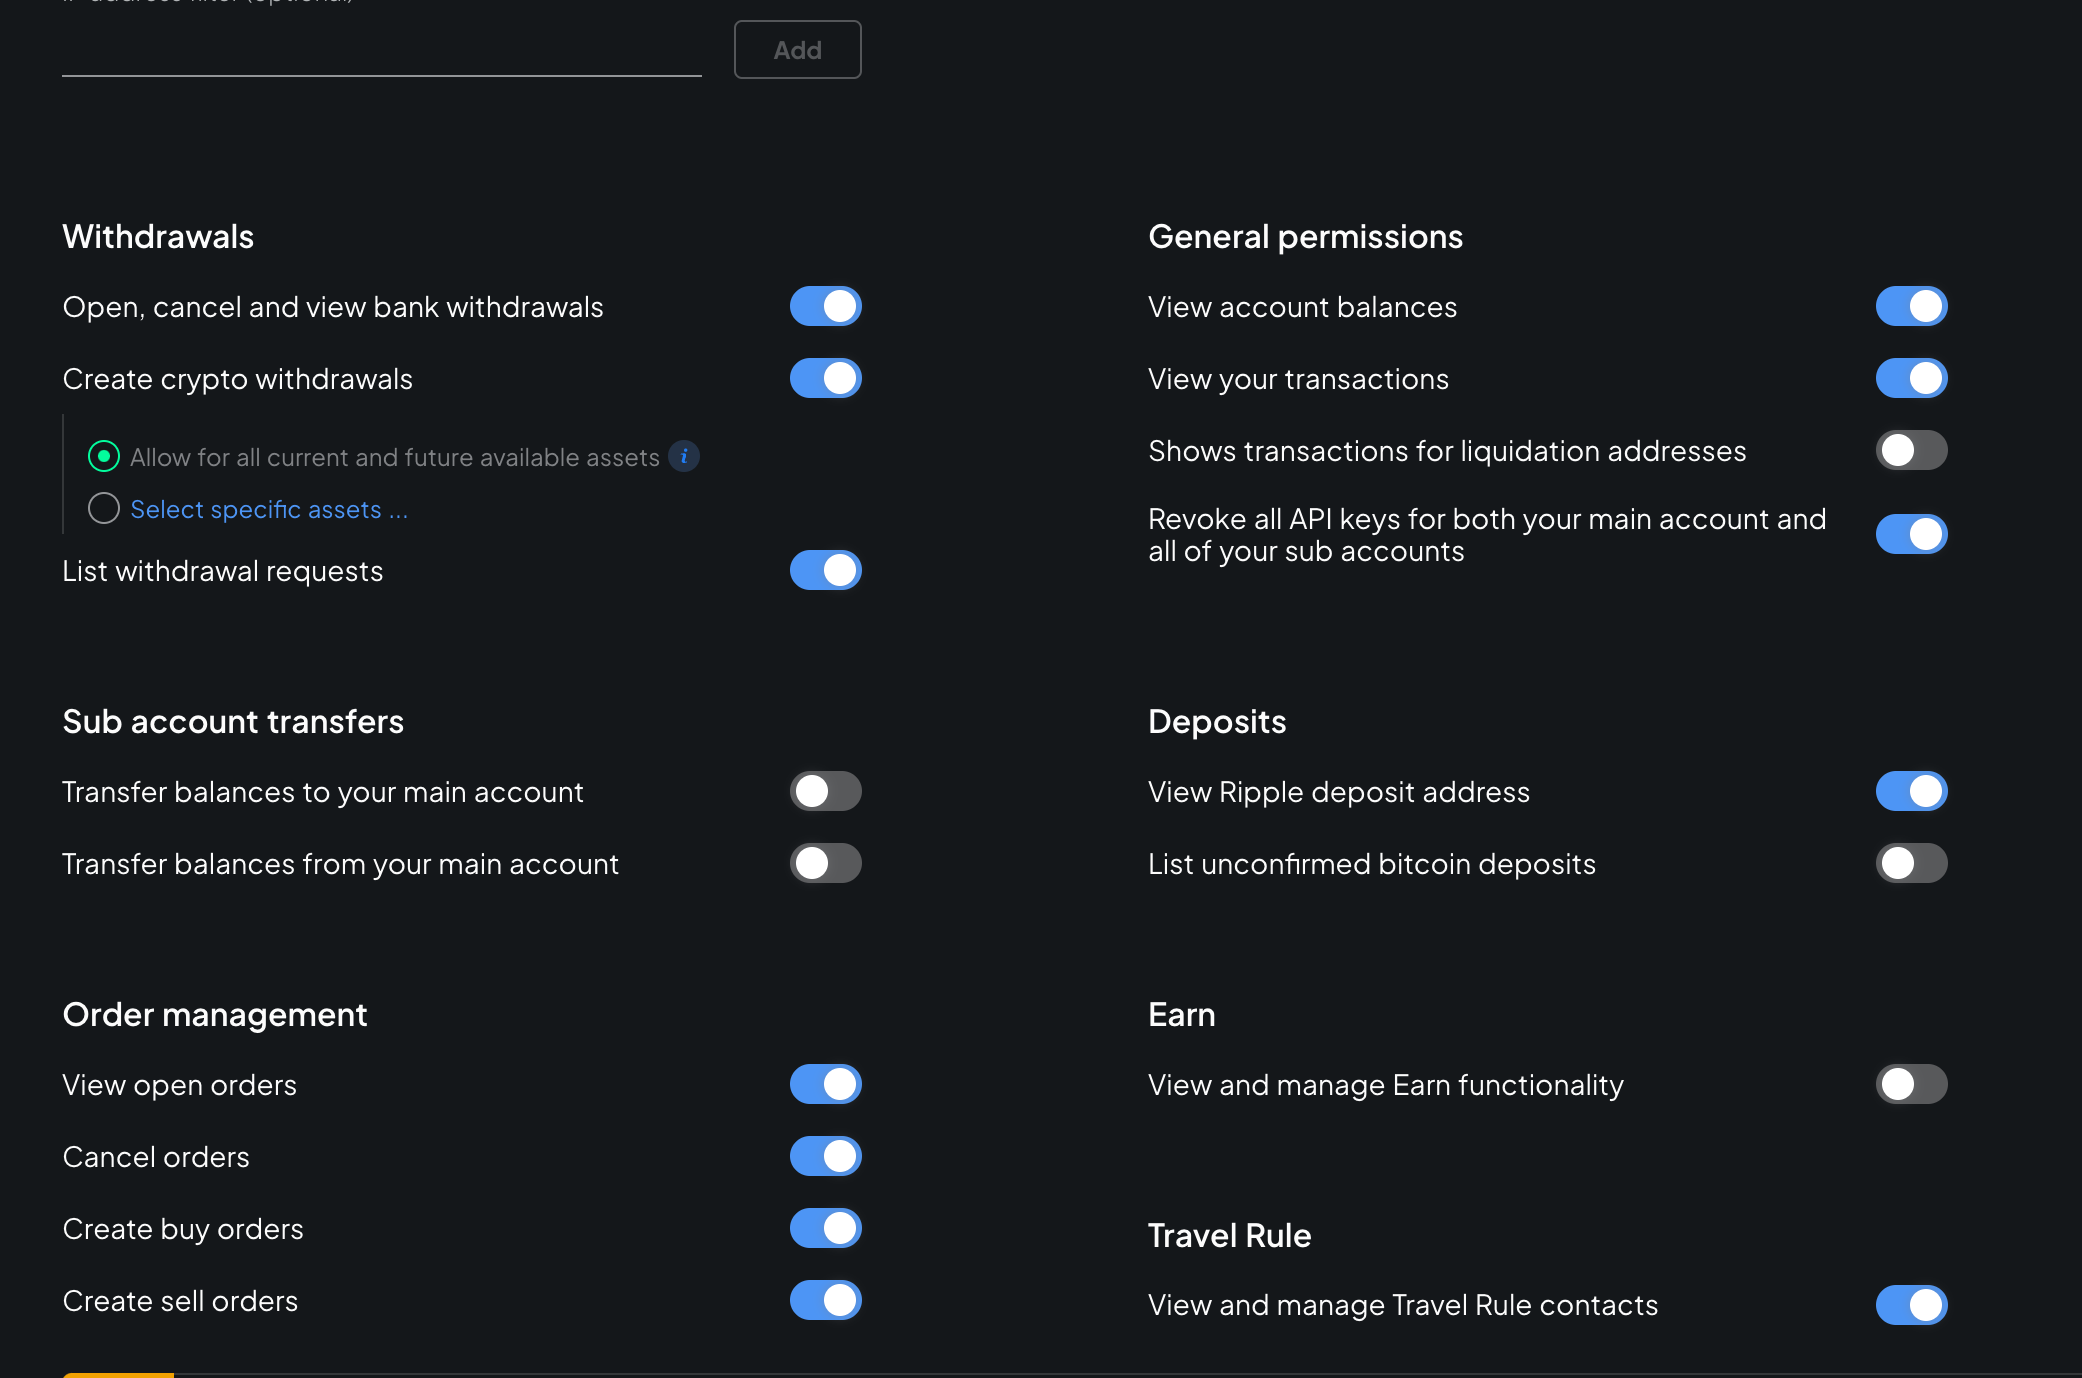
- Select Create new API key .
-
Save the
Secret
value in a secure location. You need it when you
upload your exchange API key and secret to Ripple Payments
.
Warning
Bitstamp only displays your Secret once.
- Select Activate API key . This triggers an email requesting authorization of the activation.
-
To confirm the activation, access your email and select the activation link.
Note
Bitstamp activation requires that you complete the email confirmation process.
For more information, see Bitstamp's API authentication.
BTC Markets
To generate your BTC Markets API access key and secret:
- Log in to your BTC Markets account and navigate to your Account page.
- Select the API Key link.
- Select Add new API key .
-
Select
Read & Write
permissions from the dropdown for each of the three API key actions:
- Account
- Fund Transfer
- Trade
- Select Submit to generate your BTC Markets API access key and secret. If you have two-factor authentication enabled, enter the Two-Factor Code generated by your Authenticator app.
-
Copy the
Private secret
that BTC Markets generates for your API key and store it in a safe place. You need it when you
upload your exchange API key and secret to Ripple Payments
.
Warning
BTC Markets only displays your API Private secret key once.
You can view your Public API Key on your BTC Markets Account API Key page by selecting the "eye" logo next to your Public Key.
When your integration with On-Demand Liquidity is complete and you are ready to make a live test transaction through BTC Markets, contact BTC Markets with an email to compliance@btcmarkets.net. This test transaction will allow BTC Markets to monitor the transaction, ensuring their systems recognize your customer profile.
Note
As of June 2021, BTC Markets can only allowlist IP addresses when their security system first detects a withdrawal request originating from them. Their systems will then send a verification email to the account owner with confirmation instructions. Consider this when performing penny tests.
Coinbase Prime
To generate your Coinbase Prime API access key and secret:
- Log in to your Coinbase Prime account .
- Make sure that you're in the Ripple Services Inc. portfolio and then select APIs from the account settings.
-
Make sure that the
Access Type
field shows
Portfolio
and then select
Create Portfolio API Key
.
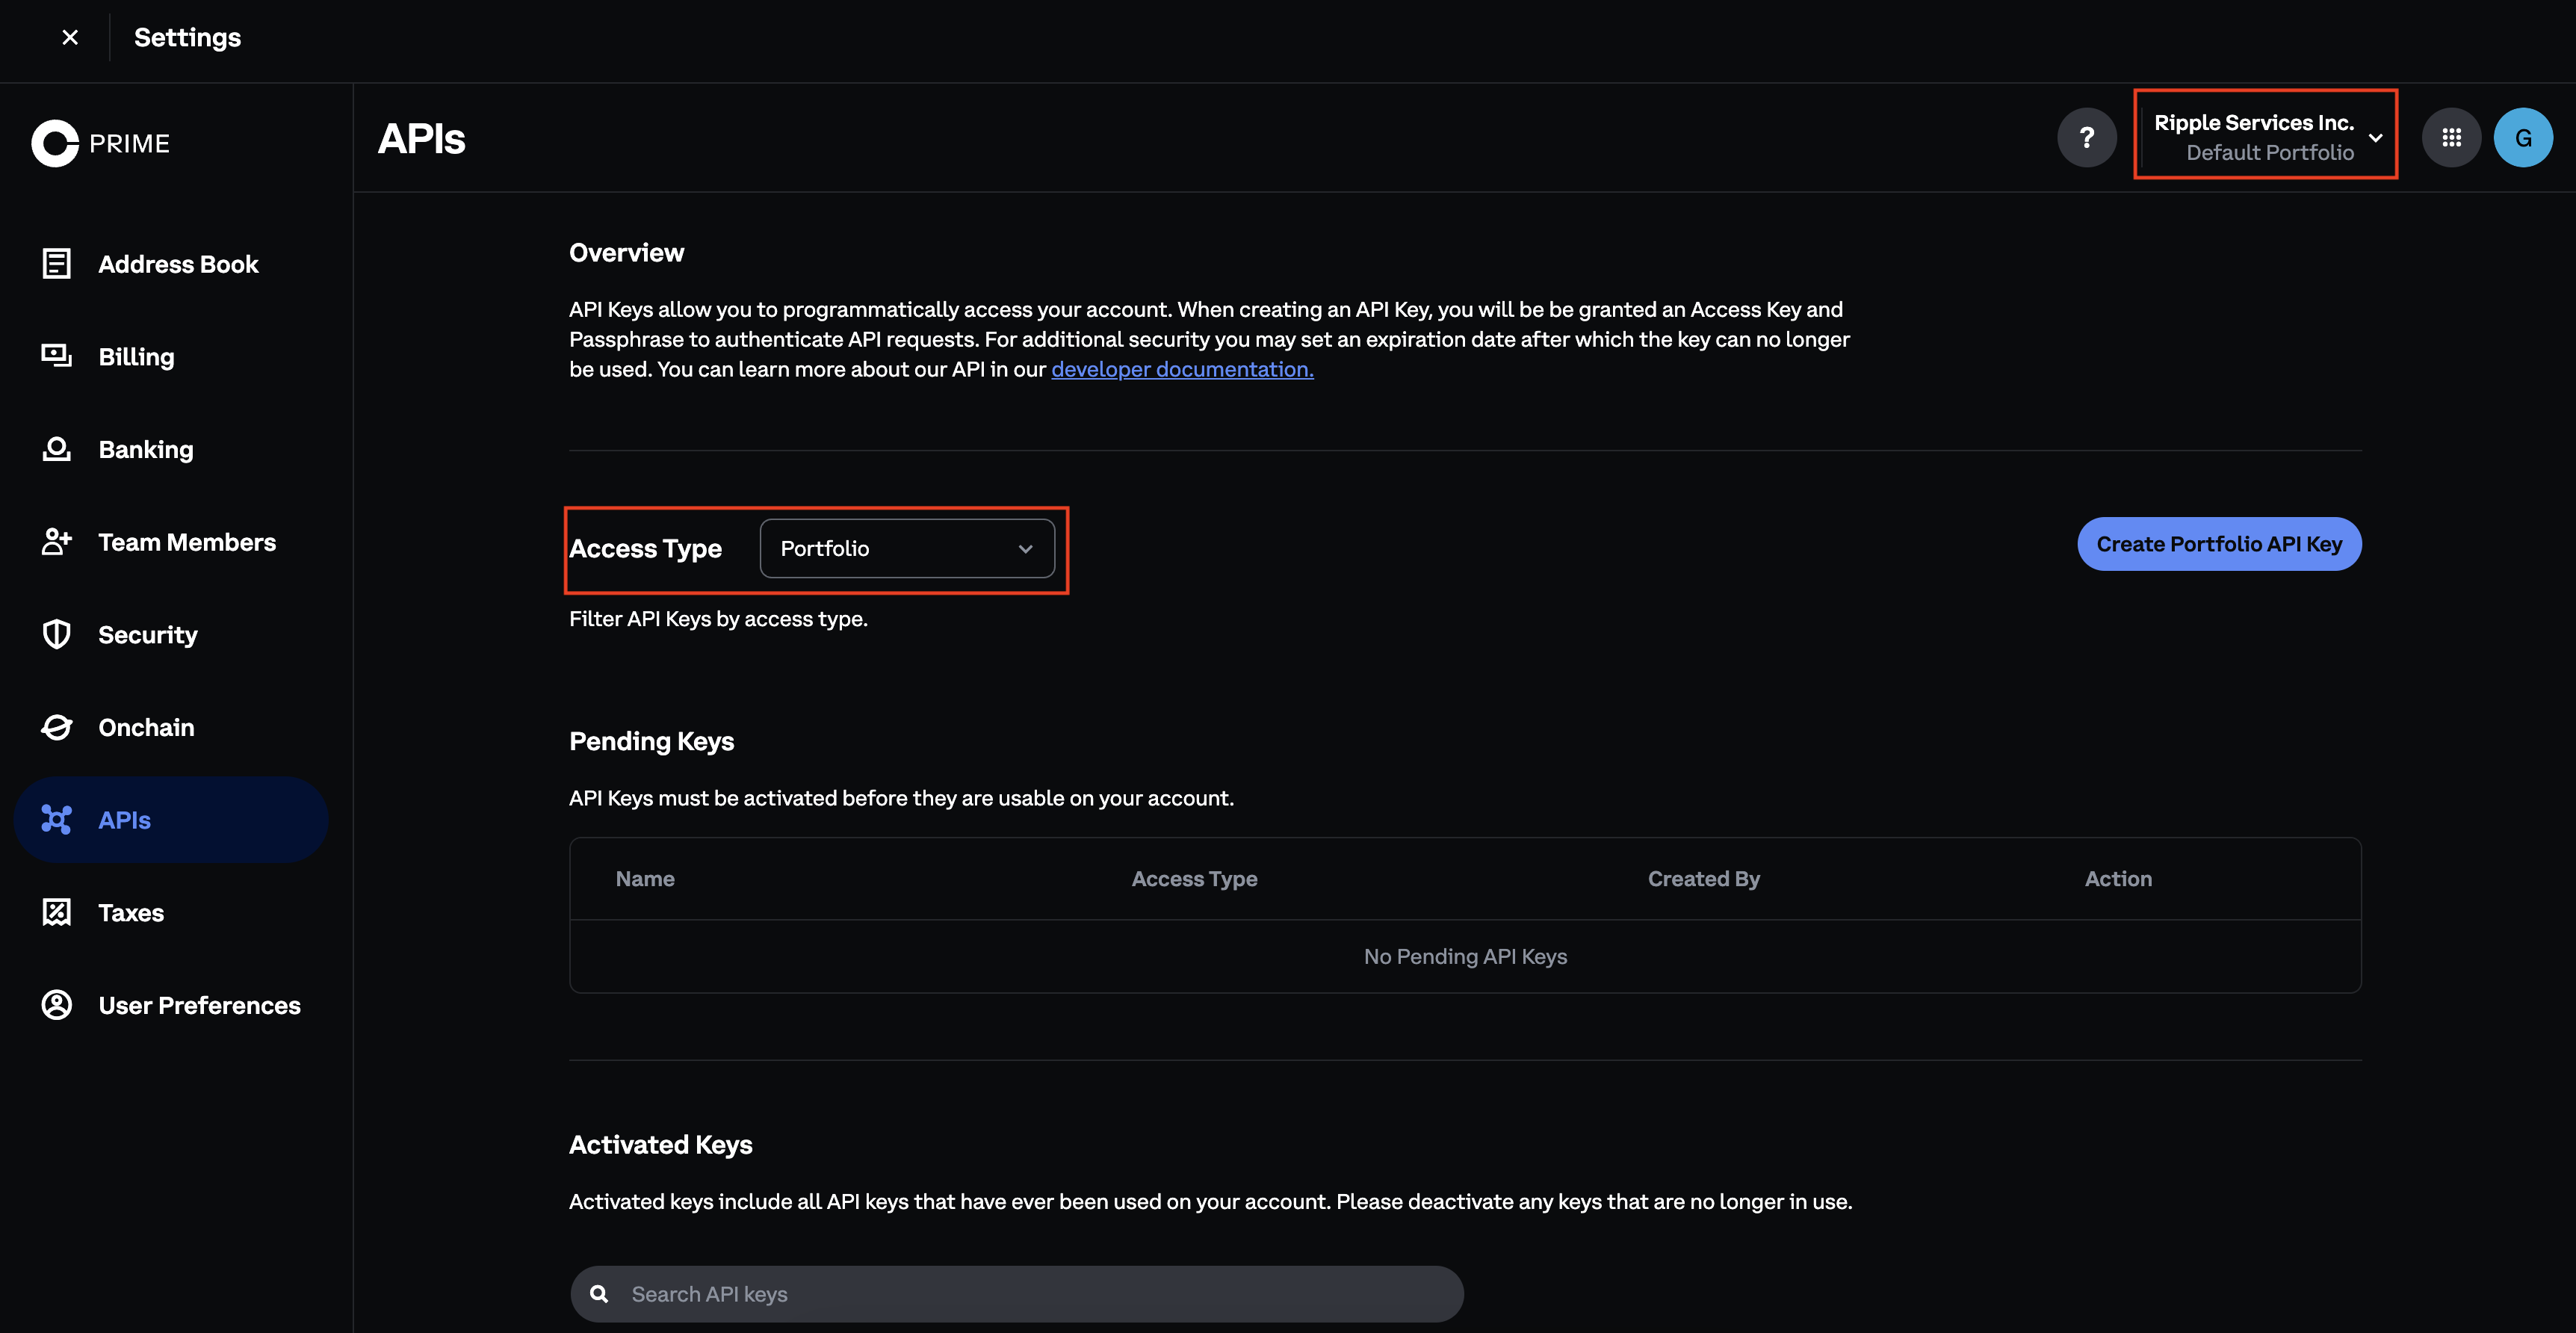
The Create New API Key page is displayed.
- In the API Name field, enter an API key nickname.
-
Select the
Access Type
field.
-
From the
Select Access
screen, select the following permissions:
- Transfer
- Trade
Note:
The Read permission should be pre-selected.
- Select Set Permissions .
-
From the
Select Access
screen, select the following permissions:
- Set the Expiration Date to Never .
-
Select
Continue
to generate your Coinbase Prime API access key and secret.
Note:
In certain cases, the majority of onboarded users (including at least one admin user) needs to approve this API change before the key and secret can be generated. If that's the case, the authorized users will be notified to review and approve the change.
-
If you have two-factor authentication enabled, enter the
Two-Factor Code
generated by your Authenticator app.
The following information will be displayed:- Access key (API key) -- can be fetched at any time
- Passphrase -- shown only once
- Signing key (API secret) -- shown only once
- Service Account ID -- can be fetched at any time
-
Portfolio ID
-- can be fetched from the URL in the browser at any time, for example
prime.coinbase.com/portfolio/7ec18g79-24f6-5e5g-335c8bc7eb31
-
Copy the
Passphrase
and the
Signing key
Coinbase Prime generates and store both in a safe place. You need them later when you
upload your exchange API key and secret to Ripple Payments
.
Warning
Coinbase Prime only displays your passphrase and signing key once.
Coins.ph
To generate your Coins.ph API key:
- Log in to your Coins.ph account and navigate to your Settings page.
- In the API Access section, select Go to API Dashboard .
-
From your API Dashboard, select
Add New Key
. The New API Key form appears.
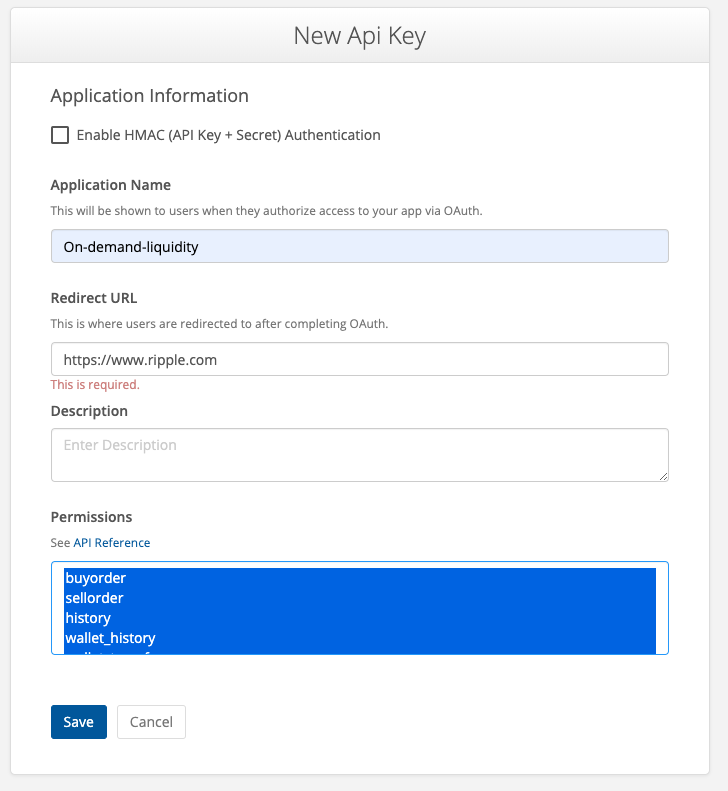
-
Fill out the
New API Key
form and select
Save
to create your key:
- Leave the Enable HMAC box unchecked.
- In Application Name , give the API key a name, such as On-demand-liquidity .
- For the Redirect URL , enter https://www.ripple.com .
- Add a Description for your key (optional).
-
Select the following
Permissions
:
-
buyorder -
sellorder -
history -
wallet_history -
wallet_transfer -
user_identity
-
-
Copy your API
Secret
and store it in a safe place. You need it when you
upload your exchange API key and secret to Ripple Payments
.
Warning
Coins.ph only displays your secret once.
After you create your API key, you can view your API name and public key with the show link on your Coins.ph API Dashboard (API Access page).
- Disable two-factor authentication (2FA) for your Coins.ph account to allow API withdrawals through On-Demand Liquidity by selecting Disable 2FA and following the prompts from your Coins.ph Account Settings page .
- Navigate to your account limits at Coins.ph and review your account limits to ensure they meet daily and monthly payments volume estimates required for your use case.
Independent Reserve
To generate your Independent Reserve API key and secret:
- Log on to your Independent Reserve account and navigate to the Settings tab.
- Select the API Keys tab.
- Select Generate .
-
In the
Select the access type of API key
form, select
Full Access
.

-
In the
Generate API Key (Full Access)
form:
-
Add an
API Key Description
for your API key, for example
ODL-Key. - Enter your Independent Reserve account Password and then select Generate .
-
Add an
API Key Description
for your API key, for example
- In the SMS confirmation required form, enter the SMS security code that was sent to your primary phone number and select Confirm .
-
Copy your
API Key
and
API Secret
combination and store it in a safe place. You need it when you
upload your exchange API key and secret to Ripple Payments
.
Warning
Independent Reserve displays your API Secret only once.
PDAX
To generate your PDAX API key:
-
Log in to the
PDAX Partners
portal.
This site is where institutional account holders create and manage their PDAX API keys and secrets.
-
Select
Create / Fetch API Key Pair
and then enter the following information to generate your PDAX API Key/Secret combination:
-
Unique Alias
Tip
Make a note of the alias you define for your API Key/Secret. After you generate your API Key/Secret, you can retrieve them using this unique alias in the future.
- OTP - Don't enter any information in this field as it's no longer necessary.
-
Unique Alias
- Select Create / Fetch . PDAX displays your key/secret combination.
-
Make a note of your PDAX API key and secret. You need it when you
upload your exchange API key and secret to Ripple Payments
.
Tip
You can always return to the PDAX Partners portal and use your Unique Alias to fetch your PDAX API Key and Secret.
Ripio
To generate your Ripio API key/secret combination:
- Log in to your Ripio Trade account.
- In the top right corner, select your User profile > API .
- Select Generate API .
- On the IP access restrictions panel, select Restricted and enter up to 30 IPs. Then select Continue .
- On the Would you like to generate a new API Key? panel in the Token name field, enter a name for the API key. Select the Purchase and sale transactions and Crypto withdrawal permissions and then select Continue .
- On the Pairs whitelist panel, select Automatic selection > Continue .
- On the Please enter the code provided by your code generator panel, enter your 2FA code and the select Continue .
-
Copy both the
API Key
and
Secret Key
that Ripio generates and store them in a safe place. You need them when you
upload your exchange API key and secret to Ripple Payments
.
Warning
Ripio displays your Secret Key only once.
Uphold
To retrieve your Uphold API key/secret combination:
- Log in to your Uphold business account and select Developer applications .
-
In the
Developer applications
window, select the developer application associated with Ripple ODL.
The Client ID and the Client secret are displayed in the Applications details section. -
Make a note of the Uphold client ID and secret. You need it when you
upload the client ID and secret to Ripple Payments
.
Tip
To fetch your Uphold API key and secret, you can always return to the developer application entry you created. For more information, see also How do I get an API key?
3. Upload exchange API secret and key to Ripple Payments
To complete setup for sending payments with RippleNet through On-Demand Liquidity, you must add the exchange API key and secret you generated for your exchange account to Ripple Payments.
In the Ripple Payments UI:
-
Sign in to
Ripple Payments
.
Note
You need the credentials that your Ripple representative supplied to your institution.
- From the home page, navigate to Settings and select Exchange Credentials .
-
Under
Exchanges
, select the
Add Credentials
card.
The Add Exchange Credentials screen is displayed.

-
Select the
Exchange
you are adding credentials for, then select
prodfor the Environment (testdoesn't use exchange keys), fill out the API Key and API Secret fields with your exchange credential information, and select Save .Note:
For the AUDD exchange, the exchange name must be
Audceven though the portal is AUDD. - If you need to add additional exchange keys, repeat steps three and four for each key.