Payment authorization
The Payment authorization feature enables you to approve or reject transactions in the Ripple Payments UI that have been initiated by a different user. This process is also referred to as ‘Maker-Checker’ or ‘Dual Approval’, as one user within your organization initiates (or ‘makes’) the payment, using the New Payment form, and another reviews (or ‘checks’) the payment, before deciding whether to authorize or reject the payment.
Note
If you are interested in activating the payment authorization beta feature, please reach out to your Ripple Customer Engineer for more information.
In this topic, you will learn:
- How payment authorization works
- How to activate the feature
- Which permissions to enable for users
- How to perform payment authorization tasks
How it works
The following diagram represents the payment authorization process:

- The payment initiator creates a new payment, entering the payment instructions, and retrieves a quote.
- The payment initiator reviews and accepts the quote.
-
The payment reviewer reviews the payment and either authorizes or rejects the payment.
- If rejected, the payment reviewer enters a reason for rejecting the payment.
- If authorized, the payment is settled and completed by the receiving RippleNet node.
Activating payment authorization
Note
Only Organization Administrators can activate or de-activate the payment authorization feature.
To activate the payment authorization feature for payments processed through Ripple Payments UI:
- Click the Settings tab.
- Click Payments .
- On the Payment Authorization panel, click the switch to activate the feature.

- In the Activate Payment Authorization? modal, click Activate .
To deactivate the payment authorization feature for payments processed through Ripple Payments UI:
- Click the Settings tab.
- Click Payments .
- In the Payment Authorization panel, click the switch to deactivate the feature.
- In the Deactivate Payment Authorization? modal, click Deactivate .
User permissions
Once the payment authorization feature is activated, your Organization Administrator or User Administrator needs to grant payment authorization permissions to at least one user per role, one to initiate payments, and another to review and either authorize or reject payments.
There are two user permissions for the Payment Authorization feature:
Permission |
Description |
|---|---|
| Payment | General permission for payments that allows users both to view payments and to initiate payments as part of the Payment Authorization workflow. |
| Payment Authorization | Specific permission for payments that allows users to review and either authorize or reject payments. |
The two roles in the payment authorization workflow should have the following permissions:
Payment initiator
Permission |
Can Read? | Can Edit? |
|---|---|---|
| Payments | ✅ | ✅ |
| Payment Authorization |
Payment reviewer
Permission |
Can Read? | Can Edit? |
|---|---|---|
| Payments | ✅ | ✅ |
| Payment Authorization | ✅ |
Business rules
Payment authorization imposes business rules to the roles involved in the authorization process:
- No payment initiator can approve their own payment but may approve other payments, if they have appropriate permissions.
- Any payment reviewer can approve or reject any payment they did not initiate.
Payment authorization tasks
The payment authorization feature requires additional tasks to be performed to make payments in the Ripple Payments UI. These tasks are divided between the two roles: payment initiator and payment reviewer.
Payment initiator task
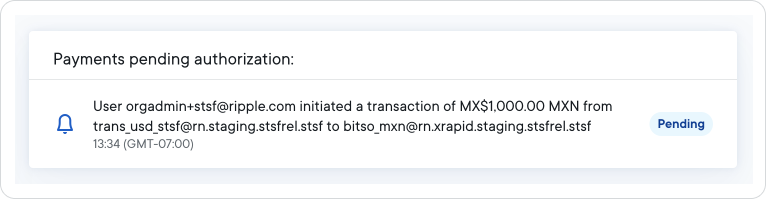
Users with the role of payment initiator use the New Payment form to initiate a payment. Initiating a payment triggers a red badge on the Payments tab and adds an item to the Payments pending authorization widget on the home page.
Initiate payment
To initiate a payment for review:
- Click the Payments tab.
- Click New Payment .
- Enter required and optional information in the New Payment form.
- Click Get Quote .
- Review the terms of the quote.
- Enter optional sender information.
- Click Accept Quote .
Once a payment is initiated, the payment will be displayed in the Payments pending authorization widget on the home page, visible to both payment initiators and reviewers.
Payment reviewer tasks
Once logged into Ripple Payments UI, payment reviewers can access payments from the Payments pending authorization widget on the home page or navigate to the Payments page to access the payments awaiting review.
Review payment
To review a payment from the Ripple Payments home page:
- On the home page, select one of the payments from the Payments pending authorization widget.
- Review the terms of the payment on the Payment Details page.
To review a payment from the Payments page:
- Click the Payments tab.
-
On the Payments page, select a payment that shows
Reviewin the Action column. - Review the terms of the payment on the Payment Details page.
Authorize payment
To authorize a payment:
- Review the terms of the payment on the Payment Details page.
- Click Authorize .
- In the Confirm Payment Authorization? dialog box, click Authorize .
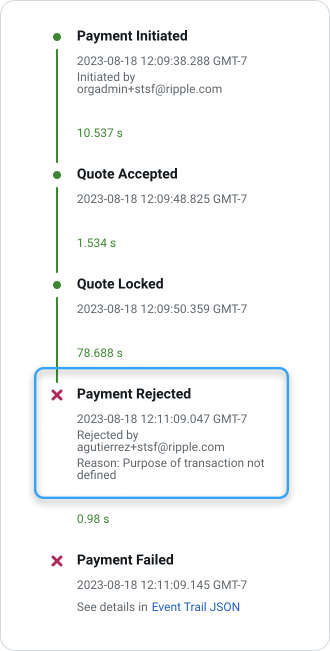
Reject payment
To reject a payment:
- Review the terms of the payment on the Payment Details page.
- Click Reject .
- In the Reject Payment? dialog box, select a reason for rejecting the payment:
Reason |
Description |
|---|---|
| Incorrect information | The account or beneficiary information or both is incorrect. |
| Cost (FX + fees) | The cost of the transaction is not acceptable. |
| Purpose of transaction not defined | The reason for initiating the payment is not clear. |
| Duplicate payment | The payment is a duplicate of another payment. |
| Other | Provide an explanation for rejecting the payment. |
Once rejected, the reason for rejecting the payment is displayed in the payment hopper on the Payment Details page: