Create a batch payment file
This tutorial describes the steps involved in creating a batch payment file that's required to send batch payments using Ripple Payments Direct.
With batch payments, you can get a quote for multiple payments and process them all at once, instead of requesting a quote for every single payment; hence, batch payments significantly reduce the time and effort required to send large volume payments. Batch payments also provide faster time to value for customers without an API integration.
Follow these steps to create a batch payment file:
- In Ripple Payments UI select the Payments tab.
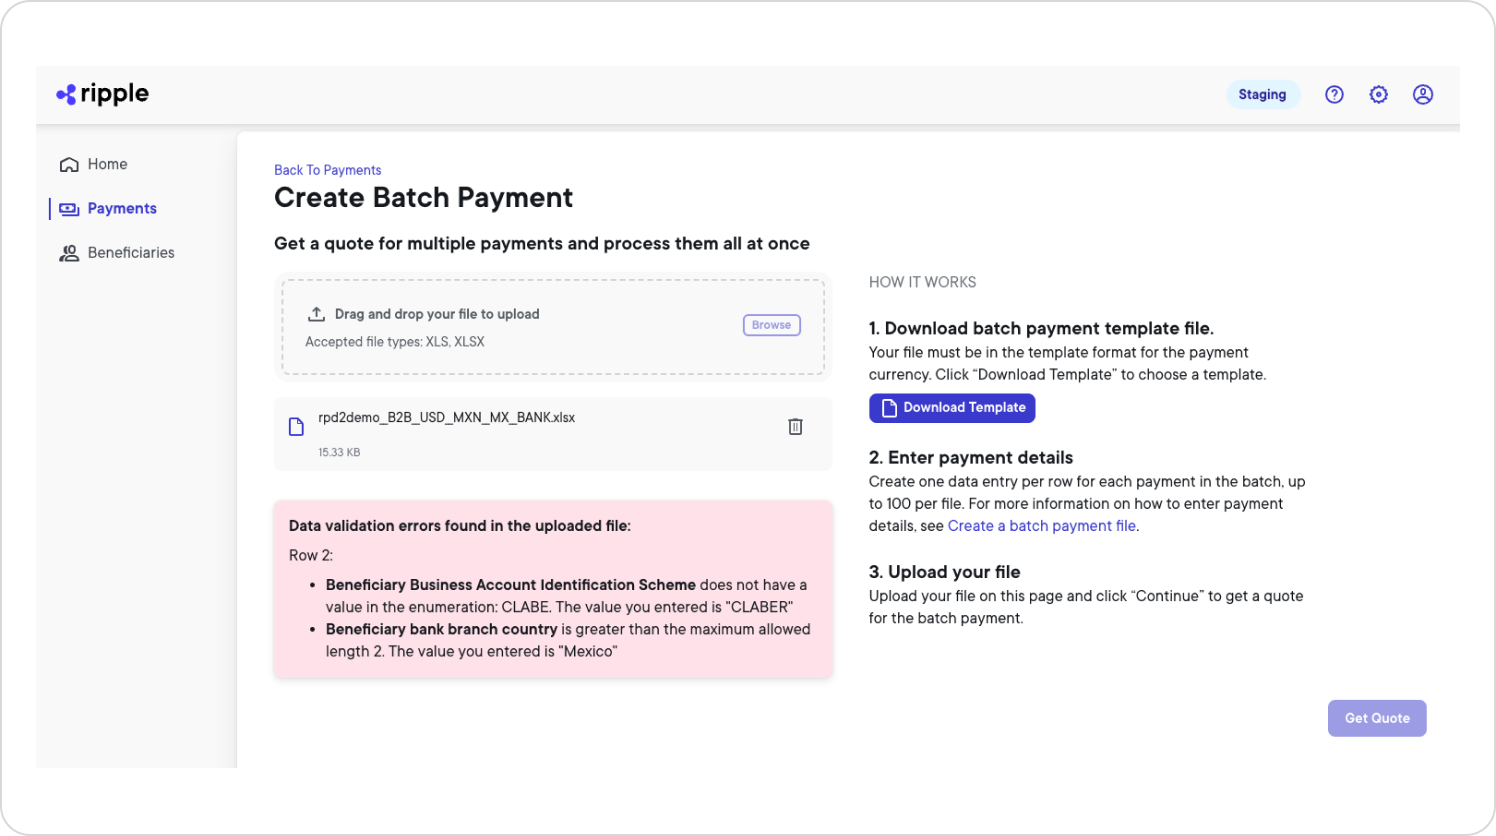
- Select Create Payment > Batch .
-
Follow the instructions in the
How it works
section.
- Download the batch payment template file .
- Enter the payment details .
- Upload your file.
- To check your file for data validation errors and (subsequently) send the batch payment , select Get Quote .
-
Only if you see error messages in the Ripple Payments UI:
-
In your local file copy, correct all errors according to the error message(s) and save the file copy.
See the image below for example errors. -
In the
Ripple Payments
UI, select the
 (trash can) icon to delete the erroneous file.
- Upload the corrected version of the file.
- Once again, select Get Quote to send the batch payment.
-
In your local file copy, correct all errors according to the error message(s) and save the file copy.
Template file
The template file for your batch payment is customized using payment details such as use case and currency.
To create your customized batch payment template:
-
Click
Download Template
, and create the template by selecting from the following fields:
Field name Description Use case The use case for the payment transaction. Payment currency The currency in which the originator will send the payment. Payout country The country of the payment beneficiaries. Payout currency The currency in which the beneficiaries will be paid out. Payout category The payout category. Only Bank accountis available. - Select Download Template .
Payment details
Edit the template file to add payment details:
-
Rename the downloaded file to a less generic name that helps you remember details of the batch payment.
For data validation purposes, you must save and upload the file in eitherxlsorxlsxfile format. - Open the renamed file.
-
Create one entry per row for each beneficiary you want to include in this batch payment (up to
100
per file).
For details on the fields you must fill out to create a payment beneficiary entry, hover over the field names.Tips to populate payment details:
- Make sure to enter information for all beneficiaries (up to 100 per file) that can be paid out in the currency specific to that template. This way, you can avoid maintaining and storing multiple files for the same payout currency but different beneficiaries.
- If you use an editing tool other than Microsoft Excel, make sure to remove any trailing blank columns as they may cause a file processing error.
-
When you enter phone numbers with the digits separated by hyphens, you may have to enclose the number in
'characters to prevent your editing tool from formatting the phone number as a formula.
Payment limits
The payout currencies currently supported by Ripple Payments Direct have the following payment limits:
| Currency | Currency Code | Limit |
|---|---|---|
| Australian Dollar | AUD |
Up to AUD 100,000 per transaction. Compliance accumulated limit AUD 30,000 per day per beneficiary. |
| Brazilian Real | BRL |
For details on payment limitations for this currency, contact your Ripple liaison. |
| British Pound | GBP |
Transactions up to GBP 1,000,000 use FPS. Transactions exceeding GBP 1,000,000 use CHAPS. |
| Canadian Dollar | CAD |
Up to CAD 100,000 per payment. |
| Chilean Peso | CLP |
For details on payment limitations for this currency, contact your Ripple liaison. |
| Chinese Yuan | CNY |
At least CNY 120 per transaction. If the purpose of the payment is salary, up to CNY 29,000 per transaction, or CNY 150,000 per month, or CNY 300,000 per year. |
| Colombian Peso | COP |
For details on payment limitations for this currency, contact your Ripple liaison. |
| Euro | EUR |
Transactions up to EUR 100,000 use SEPA Instant. Transaction exceeding EUR 100,000 use standard SEPA. |
| Ghanaian Cedi | GHS |
For details on payment limitations for this currency, contact your Ripple liaison. |
| Hong Kong Dollar | HKD |
Up to HKD ~15,680,000 (the equivalent of USD 2,000,000) per day for business payouts. Up to HKD ~7,840,000 (the equivalent of USD 1,000,000) per day for individual payouts. |
| Indonesian Rupiah | IDR |
Up to IDR 100,000,000 per transaction. Compliance accumulated limit IDR 750,000,000 per day per beneficiary. |
| Mexican Peso | MXN |
For details on payment limitations for this currency, contact your Ripple liaison. |
| Nigerian Naira | NGN |
For details on payment limitations for this currency, contact your Ripple liaison. |
| Philippine Peso | PHP |
For details on payment limitations for this currency, contact your Ripple liaison. |
| Rwandan Franc | RWF |
For details on payment limitations for this currency, contact your Ripple liaison. |
| Singapore Dollar | SGN |
Up to SGD 1,000,000 per transaction. Compliance accumulated limit SGD 65,000 per day per beneficiary. |
| South African Rand | ZAR |
For details on payment limitations for this currency, contact your Ripple liaison. |
| South Korean Won | KRW |
Up to KRW 6,000,000 per transaction for individual payouts. Up to KRW 500,000,000 per transaction for business payouts. Compliance accumulated limit KRW 65,000,000 per day per beneficiary. |
| Thai Baht | THB |
Transaction limits may vary based on the selected bank. Compliance accumulated limit THB 1,750,000 per day per beneficiary. |
| Turkish Lira | TRY |
Up to TRY 300,000 per transaction for individual payouts. Up to TRY 2,000,000 per transaction for business payouts. |
| Ugandan Shilling | UGX |
For details on payment limitations for this currency, contact your Ripple liaison. |
| United States Dollar | USD |
Using USABA (RTP/FedNow/ACH):
Using USWIRE (Fedwire):
|
| Vietnamese Dong | VND |
Up to VND 499,999,999 per transaction. Compliance accumulated limit VND 2,400,000,000 per day per beneficiary. |
| Zambian Kwacha | ZMW |
For details on payment limitations for this currency, contact your Ripple liaison. |